DIY Quick and Easy Photo Printing Process Using Blender Pens!

kyototransfer

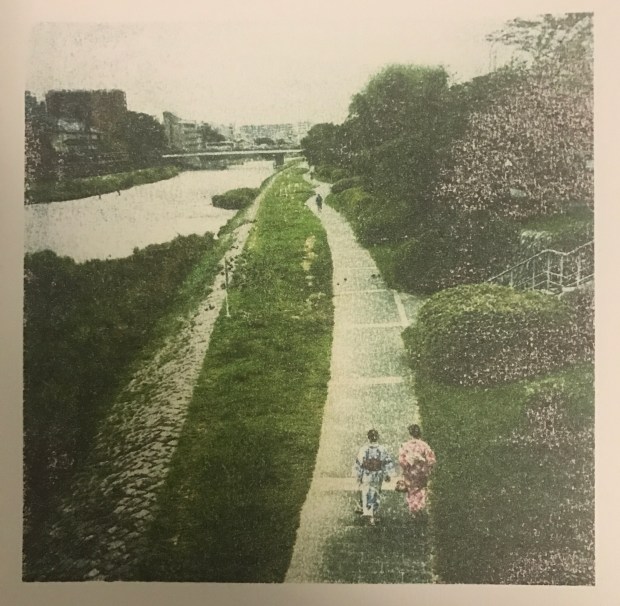
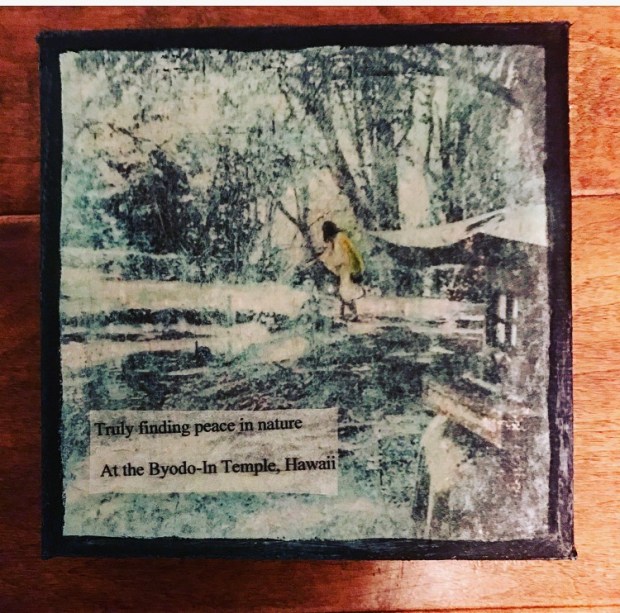
A new art technique I have been experimenting with lately has been photo transfers using colorless blender pens. Blender pens are my new favorite tool as they make the process of photo transfers quick and easy. The process only takes about 5 minutes and the prints come out with a cool vintage look. I’ve tried this process a couple of times using prints I’ve taken of places I’ve been to like the photo above taken in Kyoto, Japan and they have all turned out looking really pretty.

To create your own print all you need are the following materials:

  1. A laser jet print of a photo (it MUST be a laser photo print or it won’t transfer)
  2. Scissors
  3. Blender pens (I use Chartpak colorless blender pens)
  4. A wood panel or matte paper
  5. Tape

Directions:

  1. Take your laser jet photo print and cut your print with scissors so that you have at least a one inch border around your print.
  2. Tape your photo down face down onto a wood panel or a matte paper making sure to only put tape on the one inch border around the photo. Try to center it as much as possible so that you will have even borders.
  3. Using your blender pen, color the back of the photo print until it’s fully saturated
  4. Peel off the tape and BOOM! You have your new print!

It’s literally that easy and fast. You could literally eat a sandwich during the time it takes to make a print! It’s that quick! I swear! On the real don’t eat a sandwich while actually making the print though because the blender pens have a strong chemical scent that might make you feel a little light-headed. When completing a print make sure you are working in a highly ventilated area and maybe wear like a a SARS mask so you don’t die or something like that.You won’t really die but just be safe and take the proper precautions.

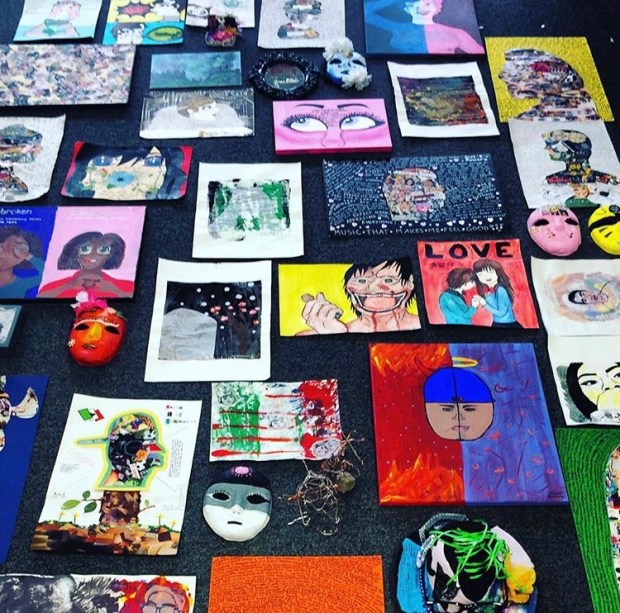
Here are some amazing examples of ones some of my students have made on wood panels:

priscillalamptransfer

jesusstreetstransfer

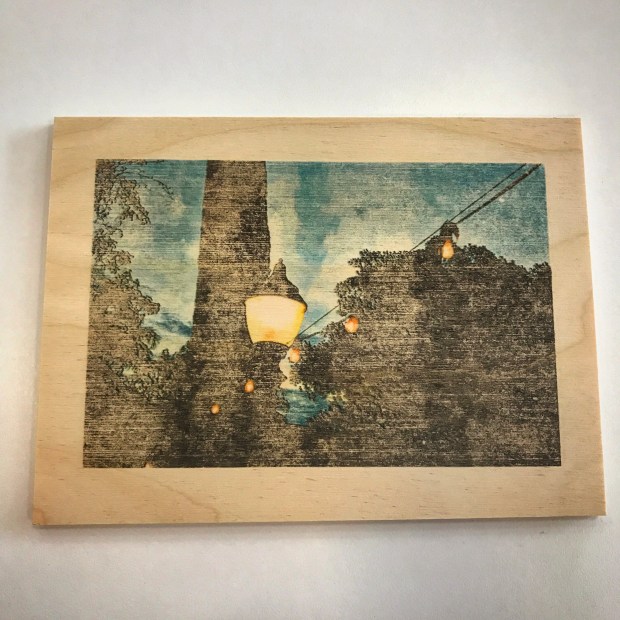
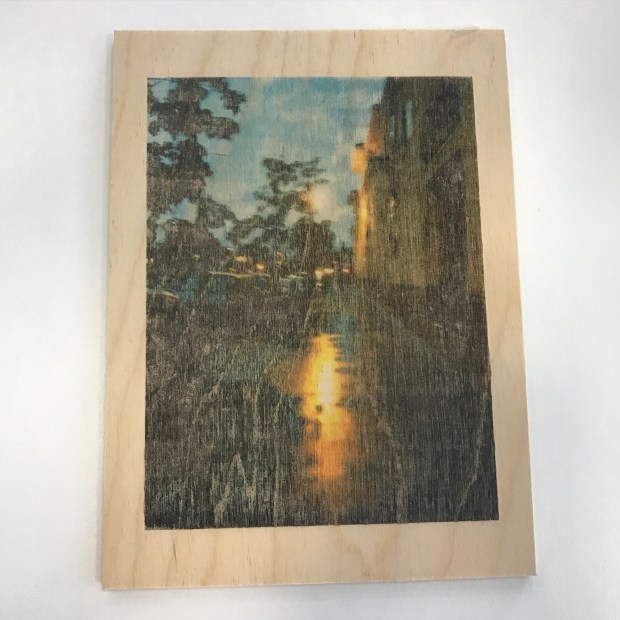
When the students were working on this transfers, all of them loved the results of their completed works. They said the best part of the whole process was taking the saturated photo prints off the wood panels for the big reveal because they were anxious to see how their transfer turned out. Many of them were also very surprised at how much of their original photo the transfer picked up. Lastly, they loved how fast the process took and some even mentioned that they wanted to use the same process at home to make Valentine’s Day cards for their friends and family. Overall, they all had fun making their prints and I think you will too!

Note: Do not try this process on canvas because it simply will not work. I tried and it looked like poop. Not literal poop but yeah…the photos didn’t transfer well so stick with the matte paper (Bristol board or mixed media paper) or wood panels. You don’t want to waste costly canvases…I did and it made me really sad so just don’t do it!

Highlights of 2016

sparkler1

(Photo credit: Shaun Luc)

Happy New Year everyone! To start the new year off, I just wanted to reflect on the past year. 2016 had it’s up and downs but it was still full of fun and memorable times. Here are my top favorite moments of 2016 :

1. Hawaii Trip with my bff, Leticia- Our spring break trip consisted of hitting up the beach and relaxing in the warm Hawaii sun, hiking in the misty rain to Moana Falls  (which was more like a mud slide and less of a falls because of the drought), and catching the beautiful sunset and the fireworks show on our last day there. Every aspect of this trip was amazing and fun.

hawaii1

moanafallshawaiia

hawaiiansunset

hawaiifireworks

2. Kaaboo with my buddy, Diana- Our new birthday tradition. This year’s concert shenanigans involved watching our old favorite performers like Rooney, Snoop Dogg and Third Eye Blind as well as hanging out and lounging with the performers in the VIP section at Kaaboo by happenstance.

jbkaaboo

kaaboo

3. Concerts with my bestie, Jessica- There have been too many to mention but whether it was seeing Ashanti and Ja Rule or hitting up Wrex the Halls, I always had a fun time dancing and singing like an idiot with my bestie at every show.

jbandjessicaconcert

4. Art Partnership with MCASD- Taking my students on field trips to the Museum of Contemporary Arts and having them showcase their art work was definitely a highlight for me and one of the most rewarding things I did this year. The the students had so much fun expressing themselves and sharing their art pieces with the public.

art1

malala

art2

5. Disneyland at Halloween with Julia- I’ve never done Mickey’s Halloween Party before so it was awesome to dress up and check out the park all decked out for Halloween. The crap ton of candy and the perk of getting on rides in like 5 minutes versus 2 hours was a plus too.

juliaandj

6. My 30th birthday- Having two surprise birthday parties, one at work with my students and co-workers and one at karaoke with family and friends, as well as a picnic with friends and a paint nite with my cousin made my birthday very special and full of love.

birthdaypresents

karaokeparty

bdaypicnic

paintnite

lagoonpainting

7. Photoshoots with Shaun- I never thought I was model material (more like troll material) but it was fun doing some cool photoshoots around San Diego with my friend, Shaun Luc.

bubble2.jpg

sprucestbridge

blackandwhite

8. The Wizarding World of Harry Potter-Butter Beer and the Great Feast galore! So many yummy treats on this trip! In addition, I got to be the “Chosen One” during the wand ceremony at Ollivander’s Wand Shop. All my friends were jealous and wanted to kill me. It was great.

harrypotterworld

hpwand

9. Killing my couch with my pal Earl- I had to get rid of my old couch. I couldn’t sell it and no one would take it, not even the Salvation Army, so the couch had to go. It was hilarious and even cathartic “making the couch die” but I definitely think the best part, besides the destruction of the old couch, was the satisfaction we got when my house was sans old couch and was rearranged and finally restored with the new couch.

destroycouch

newcouch

10. Christmastime- Christmas break has been a blast. Everyday I spent it doing something fun, from Christmas parties with friends and family to hanging out with friends from out of town one-on-one, it has been great catching up with the people I care about so much.

familyforchristmas

christmasfood

Overall, 2016 made me thankful for the everything in my life. I definitely feel like I was able to get closer to my friends and family and I am blessed I have been able to have many happy moments with them. If 2016 was this good, I am looking forward to was 2017 will bring. Here’s to more love, happiness, and amazing experiences in the coming year! ❤

sparklers2

(Photo credit: Shaun Luc)

Fun DIY Crafty Project: Photo Transfers onto Canvas

phototransfersupplies

When thinking of crafty Christmas presents, something personalized that you can easily make for someone is a photo transfer onto canvas. Recently, I’ve gotten into making these and they’ve turned out pretty cool. I’ve even had some of my students make some for pieces to be used in the Museum of Contemporary Arts in San Diego.

To make a photo transfer all you need is:

  1. A photo printed onto computer paper
  2. A canvas (I usually use a 5X5 canvas)
  3. Liquitex Ultra Matte Gel
  4. A paint brush
  5. Scissors
  6. Water color paint or water color pencils
  7. Water in a small spray bottle
  8. Acrylic paint (for a border on the canvas)
  9. Tracing paper (for text)

Directions:

Step 1: Print a photo that you like onto computer paper. Make sure you size it correctly so that it will fit nicely onto your canvas.

Step 2: Using a paint brush, apply a think layer of Liquitex Ultra Matte Gel onto your canvas.

Step 3: Cut out your printed photo and place it face down onto your canvas. Smooth photo out as much as possible and let it sit overnight so it can dry.

Step 4: Using a small spray bottle. spray water onto the photo and gently rub the canvas. Be careful not tear the photo and continue rubbing the photo until the picture is completed revealed. After picture is revealed, let the photo dry for 5-10 minutes.

Step 5: Once photo is dry, you can use watercolor paint or pencils to enhance the colors in your photo. If you feel like you don’t need to add color, just seal the photo in with a thin coat of the Liquitex Ultra Matte Gel.

Step 6: Paint the sides of the canvas with acrylic paint and even paint a border if you like.

Step 7: If you want to add text, print out a quote or any words you would like onto tracing paper then cut out and using Liquitex Matte Gel to glue down.

Here’s are some examples of some photo transfers I have made that I felt turned out pretty nice:

hawaiifeedbirds

japanintherain

What I love about these photo transfers is that they have a retro feel to them that looks like a drawing out of an old book you might pick up at the library or a vintage book store. Of course the photo transfers are not perfect photo copies of pictures onto a canvas but that’s what make them look different and special. The couple of transfers I have made were created as pieces to place in my condo to help me remember favorite places I have traveled to and when I have more time I’m hoping to create a few more.

Home Improvements in My New Home

keystonewplace

When I first bought my condo a year ago, my American Dream became a reality as I finally had a place to call my own. Growing up, my family only rented to so I was used to keeping spaces as they were when we first moved in and seeing white walls. After saving up and purchasing my condo, I now had the opportunity to get creative. Over the past year, I have taken on some small tasks to get my place the way I wanted and I wanted to share them because I feel like these minor improvements can actually make the biggest changes in making a place seem more “homey”.

Five ways I improved my new home:

  1. New Paint- Before even moving in, the first thing I did was give my home a face lift with a new paint job. When I bought my home, the walls were a sand color. Though there was nothing wrong with the previous color, I felt it would be nice to change the color to a pretty grey-blue color to soften the color palette. Initially, one of my friends and I got together and tried to make a project out of it. We actually spent a good day painting with minor breaks to eat Costco sandwiches before realizing that to be more cost and time efficient, I should call a professional. Unless you have a big group of people who would all be free to help, I highly suggest getting a professional painter. My friend and I took almost a whole day to paint and we only got the living room completed. When the professional came in, he painted my whole condo within a day time frame. The following picture is a before (left photo) and after (right photo) that shows the difference that the new paint made in my kitchen. beforeandafter
  2. New Lighting- When I first moved in, I had florescent lighting fixtures that looked like they haven’t been switched out since the place was first built. The color from the florescent light casted a dirty yellow color everywhere. In order to change out the lighting, I went to Lowe’s and got updated fixtures that not only fit better with my new household but also provided more natural lighting.
  3. Small Additions- One addition that made a huge difference was adding ceiling fan light fixtures to each bedroom. I made this change to add brighter, natural lighting to each room as well as to help with the air flow. Another addition I made was switching out the mirrors in each bathroom. When I first moved in, I noticed the main mirrors in each bathroom that my condo came with were older and were slightly rusting on the edges. Since I would be looking in these mirrors on a daily basis, I switched them out for a newer mirror that had a pretty mosaic edging. The new mirrors were beautiful and helped to brighten up each bathroom. I wish I had a picture of the old bathroom mirror of the rust to show a before and after but all I have is a photo of the new mirror which you can see below. newmirror
  4. Getting organized- When I first moved in, I wanted to have nice, clean spaces, and not a hoarder’s dream home, so I made sure that all my things had a place. Cute mementos that I wanted to be on display as well as movies and books I would need access to on a daily basis would be on my living room bookshelf as you can see in the following picture.livingroom 
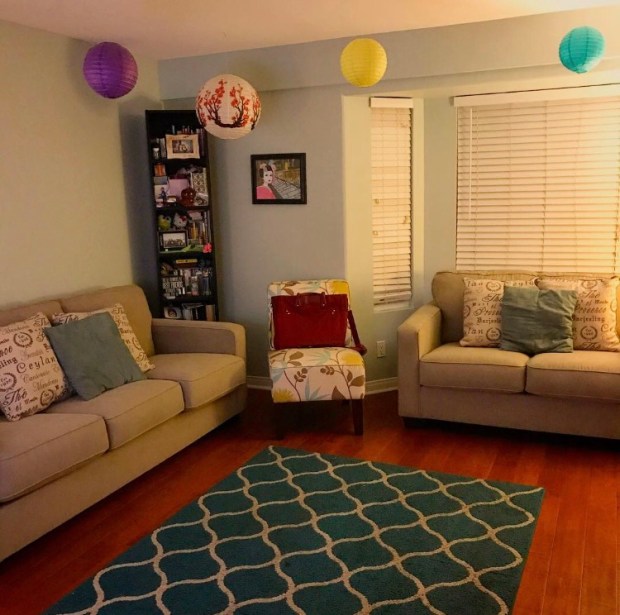
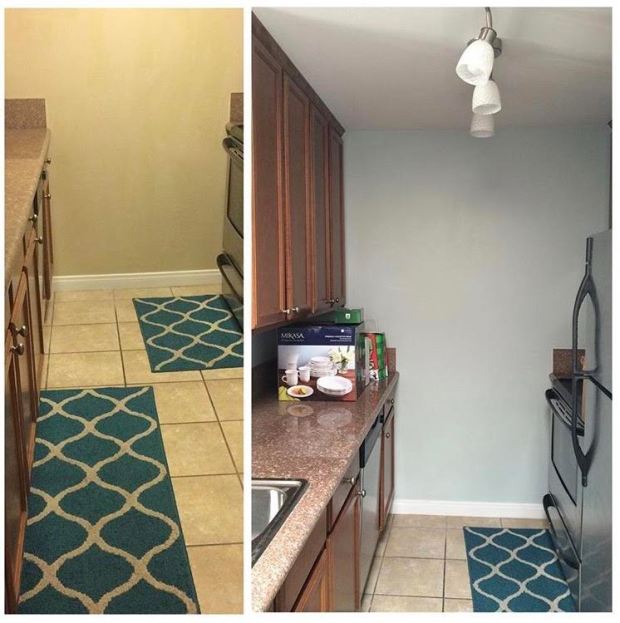
This was basically how I assessed all my things in every room. Anything out in each of my rooms were things that I used frequently and everything else would be tucked away in a closet or in a bookshelf bin.  Right now, I am still working on getting rid of a lot of things and I’ll probably donate to Goodwill and sell some stuff at Buffalo Exchange.
  5. Decorating- The last thing I did after moving in and setting up was decorating. This was probably my favorite part. When decorating, I made sure to stick with a color scheme and theme. For my color scheme, I stuck to teals, blues, beiges, and golds to compliment the light brown cabinets in the condo. In addition, since I love to travel, I got pieces that were inspired by different places of the world I have been. For example, my bedroom pictured below, uses a lot of cool colors to help create a “beachy” Hawaiian feel. room 
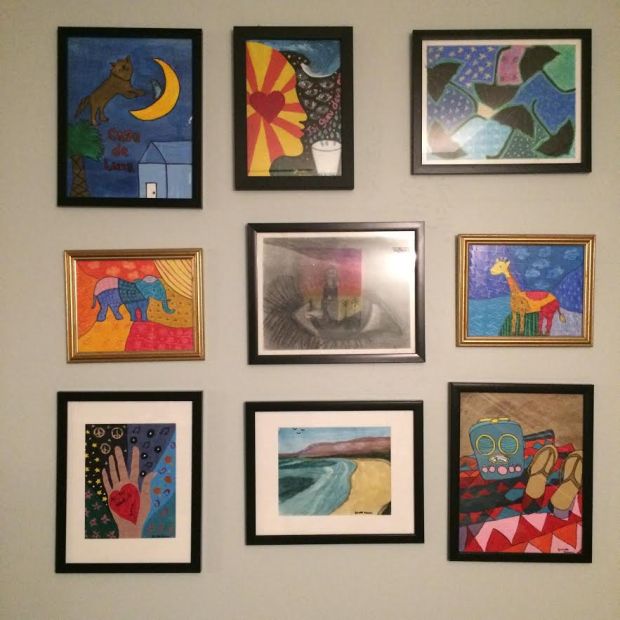
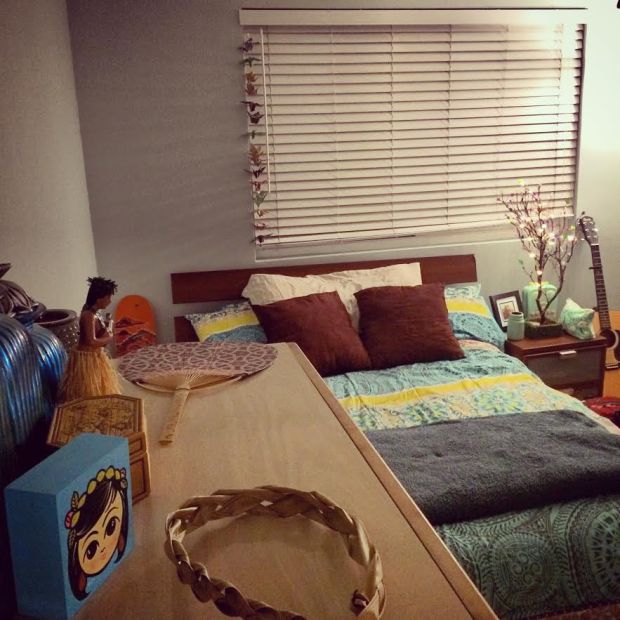
Lastly, I hung up art pieces that I created or that friends had given me based on how well they flowed with each other and matched the theme of each room. I even created an art wall which you can see in the pic below in my room with some art pieces I made over the years.artwall

These small improvements definitely helped to make my place feel like home and they are definitely things that anyone can do too. Some of these enhancements such as a new paint job and new fixtures do cost a little bit of money but it is money worth spending to help create a space that you would enjoy coming home to. Furthermore, having self-made art pieces or even just art that you love up in your house will add small personal touches that will help to create a place that’s a visual representation of you.